Carbon fibre fabrication for hobbyists: project ideas with forged carbon, vacuum bagging, moulds and reinforcement.
Carbon fibre fabrication for hobbyists: project ideas with forged carbon, vacuum bagging, moulds and reinforcement.
Working with carbon fibre as a hobbyist can be hugely rewarding and it need not be prohibitively complex or expensive. This article rounds up approachable project ideas and techniques that focus on forged carbon, basic vacuum bagging, mould-making and sensible reinforcement strategies. If you already have a small workshop and are comfortable with epoxy systems, you can scale these projects to suit weekends or longer builds. The aim here is to inspire practical, achievable projects rather than industrial processes so you can learn by doing and improve your skills incrementally.
Forged carbon remains an attractive technique for makers because it uses short, irregular pieces of fibre to create a mottled, stone-like finish that is quicker to lay up than woven cloth. To try forged carbon, cut or rip up scrap carbon sheets or trimmings into small shards and mix them with a thixotropic epoxy or polyester resin so they suspend evenly. Pack the mixture into a cavity or between two mould halves and compress during cure using a press or clamping system to expel excess resin. Finished parts often benefit from light sanding and a clear topcoat to enhance the depth of the pattern and to protect the surface.
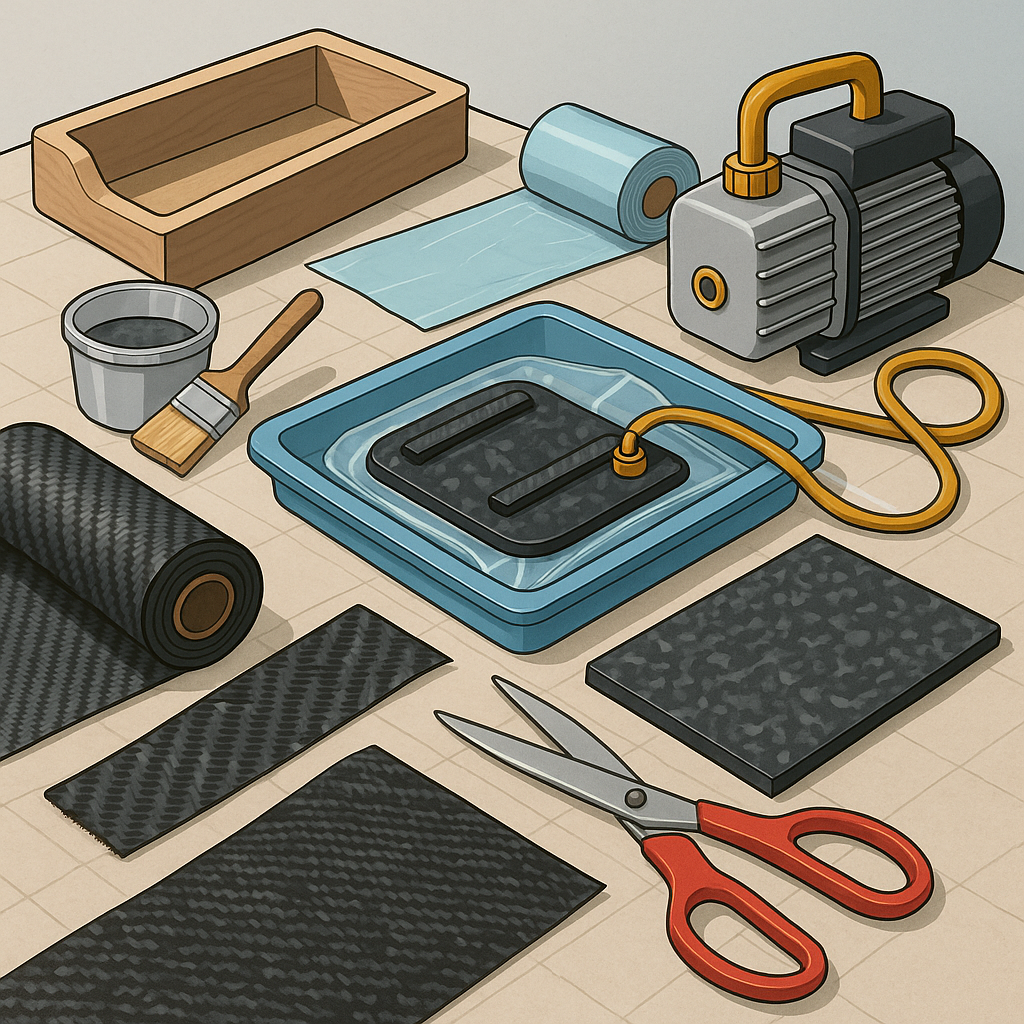
Vacuum bagging is a simple technique that dramatically improves laminate quality by removing trapped air and consolidating plies under uniform pressure. For hobbyists a basic setup uses a vacuum pump, vacuum bagging film, sealant tape, a breather cloth and a release film, and can produce stronger, lighter parts with fewer voids. Small projects like camera mounts, drone arms or boat fittings respond particularly well to bagging because you can use a single small pump and a DIY bagging table made from a flat board and a sacrificial layer. Curing options include room-temperature cures for convenience or oven cures for higher-performance epoxies if you have the space and safety arrangements.
The following list suggests a range of projects that suit different skill levels, materials and the techniques mentioned above.
- Forged carbon key fobs, badge panels or phone case inlays for quick practice with minimal material and short cure times.
- Vacuum-bagged drone arms or micro racing car chassis for improved fibre consolidation and weight savings under load.
- Custom moulded handles or grips made from silicone moulds and hand-laid carbon skins for ergonomic testing.
- Boat hardware, cleats or small hatches using a combination of woven cloth for directional strength and forged carbon for cosmetic surfaces.
- Reinforced brackets or mounting plates where sandwiched foam cores and vacuum bagging produce stiff, lightweight panels.
Good mould-making underpins repeatable results, and for hobbyists silicone rubber moulds are the most forgiving choice for complex shapes and low-volume runs. Make a hard mother mould from fibreglass or plaster to support flexible silicone for larger pieces, and ensure you use a suitable release agent so cured parts demould cleanly. MDF or 3D-printed masters are acceptable for one-off parts, and for higher temperature epoxies consider higher temperature-resistant mould materials. Proper registration, filleting of sharp corners and consideration of demould angles simplify the process and reduce wasted material during early trials.
Reinforcement strategy matters as much as resin choice because fibre orientation dictates stiffness and strength for a given part. Use woven cloth where multidirectional strength is required and unidirectional tapes or pre-pregs for long-span elements where load direction is known. Hybrid builds that combine thin foam cores, wooden inserts and localised reinforcement zones can keep weight down while preserving impact resistance. For practical advice and build guides aimed at makers you can visit my site at WatDaFeck for tutorials and supplier leads that support these techniques and projects.
Safety, finishing and realistic expectations are key: always work in a well-ventilated area, wear appropriate respiratory and skin protection, and dispose of resin waste responsibly. Start with small experiments to learn cure profiles, mixing ratios and sanding techniques, and expect a learning curve as you dial in pressures, bagging setup and mould release practices. With patience and modest tooling you can fabricate attractive, functional parts using forged carbon, vacuum bagging, solid moulds and considered reinforcement, and those skills will scale up as your ambitions grow and your workshop evolves.
Follow me on: Facebook: https://www.facebook.com/watdafeck3d · Instagram: https://www.instagram.com/watdafeck3d/.
Comments
Post a Comment