Step-by-step build log: a 5-inch FPV freestyle drone for hobbyists.
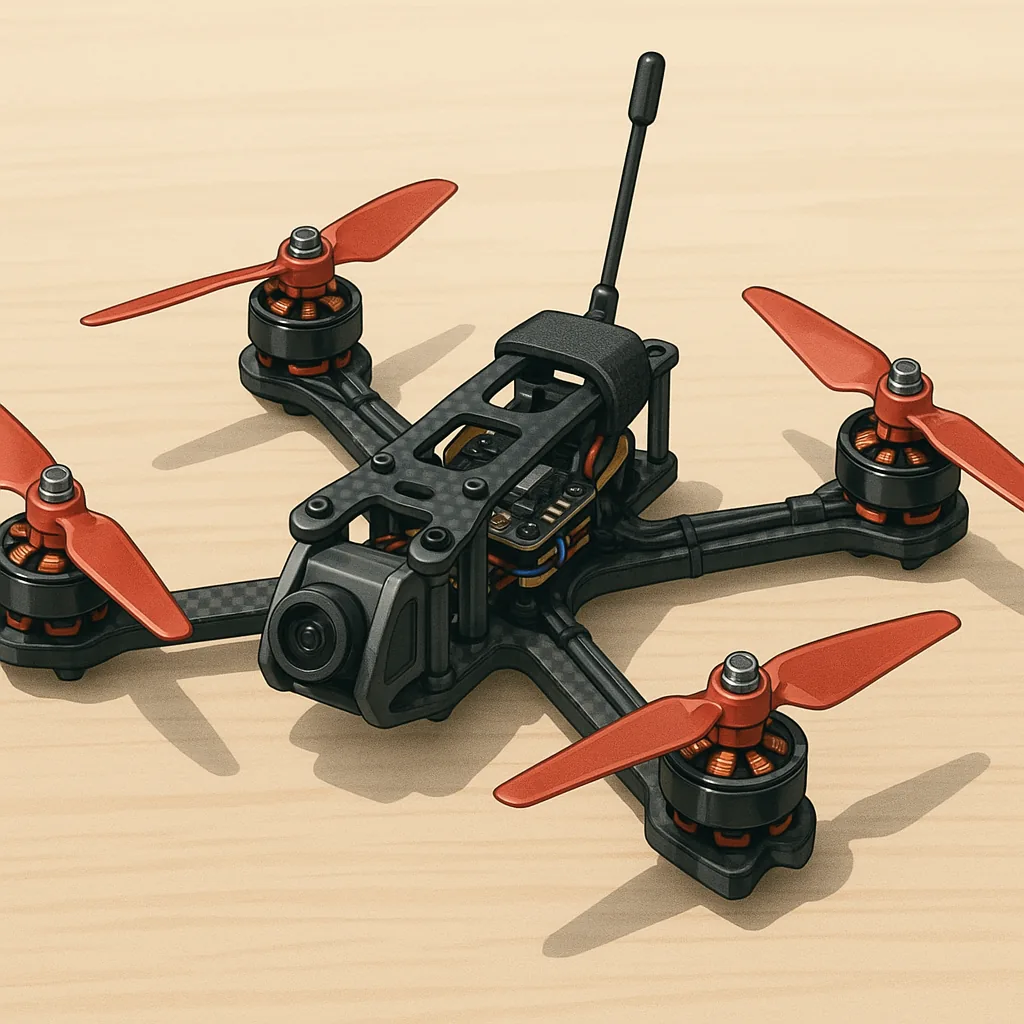
I decided to document the build of a 5-inch FPV freestyle drone to capture decisions, mistakes and tuning notes so other hobbyists can follow the process and learn from my experience. I started by choosing the frame first because that determines motor spacing, prop clearance and stack layout, and settled on a stiff carbon fibre X-frame with 5mm arms for impact resilience and easy motor swaps. Frame size is a trade-off between agility and power, so 5-inch felt right for mixed freestyle and casual racing, and the frame also had removable top and bottom plates to simplify wiring and camera mounting. Choosing a solid frame paid back instantly during assembly and crash repairs, and it set the tone for the rest of the build.
With the frame in hand I test-fitted motors and props to confirm clearance and adjusted mount holes where necessary to ensure the motors sat square and true in the arms. I used 2306 motors on 4S for a good mix of torque and efficiency and selected 5x4.3x3 tri-blade props for punchy throttle response while keeping noise reasonable. I paid attention to motor direction early on and marked the arm orientations so the factory-provided motors could be installed without confusion, and I trial-mounted the flight stack with nylon standoffs to keep vibration isolated from the flight controller where possible. Wiring routes were planned before soldering so the power leads, signal wires and camera cable would be tidy and unobstructed for the antenna runs.
The electronics stack comes next and I chose a 4-in-1 ESC with BLHeli_32, a Betaflight-compatible flight controller and an HD-ready FPV camera and VTX to balance weight and video quality. Battery choice is crucial for both performance and safety, and I used a 1500mAh 4S LiPo with a reputable C rating and an XT60 connector, plus a Deans adapter for older packs. Always charge on a non-flammable surface and use a quality balance charger, and never leave a charging battery unattended. For reference and parts lists I keep build notes and wiring diagrams on my site at https://watdafeck.uk. I also fitted a soft mount under the flight controller and looped the antenna away from carbon to preserve video link performance.
Before attaching props I performed ground checks: ESC calibration, motor spin direction confirmation, and arming checks with props removed to avoid accidents. I balanced each prop on a small balancer and used thread locker where metal nuts secure props, while plastic prop-nut setups were checked for proper seating and heat shrink protection. Flight modes were configured in Betaflight with a three-position switch for Angle, Horizon and Acro modes and a separate switch for an OSD toggle and beeper; Angle for practice and orientation, Horizon for assisted flips back to level, and Acro for full manual control. With the props off I ran a short idle test to listen for motor bearings or ESC noise that might indicate a problem before the maiden flight.
Tuning took the most time and went through a few iterative cycles: start with stock PIDs, fly gently in Angle to verify behaviour, then switch to Acro to evaluate oscillations, drift and motor temps. I used small PID increments and adjusted feedforward and filtering after reviewing Blackbox logs to see where the loop was compensating hard for noise, and I kept flight logs short and focussed rather than chasing tiny numbers. Prop choice heavily influenced tuning—tri-blades needed different gains from two-blades—so I noted those differences for future builds, and I recorded a pre-flight checklist that included LiPo voltage check, prop tightness, antenna position and failsafe settings to ensure safe flying every session.
Finally, respect for LiPo safety and sensible flying habits will keep the hobby enjoyable and sustainable for years, so store batteries at storage voltage, retire any swollen cells responsibly, and always carry a small fireproof bag for transport and charging. Practice modes with Angle and Horizon when learning, then move to Acro as confidence grows, and log every significant change so you can revert if a tune goes wrong. The build reinforced that a good frame and careful prop and battery practice make tuning easier, and taking one step at a time avoids costly mistakes while you develop pilot skills.
Follow me on: Facebook: https://www.facebook.com/watdafeck3d · Instagram: https://www.instagram.com/watdafeck3d/.
Comments
Post a Comment